or
I ordered a SanDisk Sansa Clip Zip MP3 player with 4 GB storage from Amazon, because that player includes a micro SD card slot that will take a 32 GB micro SDHC card. (SDXC cards can be larger than 32 GB, but the Clip Zip doesn't recognize SDXC cards.) I ordered just such a card made by SanDisk at the same time. The Clip Zip was about $40, and the micro SDHC card was $24. Together the Clip Zip and the external card can hold 36 GB of music, which should be more than enough for my whole music library.
I was aware from the Amazon reviews of the Clip Zip that it treats music in the internal memory very differently from music on the external card. The manual doesn't say how to create playlists for songs on the external card. What little advice I could find on the internet said to plug the micro SDHC card into into the computer, copy music files to the card, and then use Winamp to create playlist files on the card referring to the music on the external card. But I already have my whole music library on the computer, with playlists for all of it; I wanted to just sync my existing library including playlists to the Clip Zip's external card, rather than recreating all the playlists. That advice wasn't good enough; I knew I could do better.
The documentation was terrible, but I figured it all out, and now I can easily manage my music library on my computer and sync it to my Clip Zip. I'm sharing this document so that you too can put your whole music library on one inexpensive device without going through all that pain of learning. Don't let the length of this web page scare you, I just like to explain things.
If you're in a hurry you can skip to the "Let's Get Started" section.
The Clip Zip's manual doesn't explain how to copy music and playlists to
the external card; it only tells how to use Windows Media Player to copy
music files and playlists to the internal memory, not the external
card. Before I could figure out how to sync my music library to the
external card, I had to understand the problems that the manual tap-dances
around. The main difficulty is Digital Rights Management, or DRM.
Some music purchased or leased online will only play on a limited number of
devices as a protection against people sharing the music illegally.
Such music files are said to be DRM-protected.
At first I wondered why the designers gave the Clip Zip both internal and external memory in spite of so many limitations. But then I realized that the relatively small internal memory keeps the device inexpensive, yet allows users to use DRM-protected media, including audio books from Audible.com and the music subscription service Rhapsody.com. The external card slot allows up to 32 GB more room for music files very inexpensively, as long as the music isn't DRM-protected. This combination of features gives the Clip Zip a nice list of features for a reasonable price. Unfortunately it can be difficult for customers to figure out how to unlock the full potential of the Clip Zip, but maybe this web page will help some people.
Other possible solutions exist. For instance, one could use Windows Media Player to manage the library on the computer, and then use the free Microsoft utility SyncToy to copy the library to the external card, as long as the library is DRM-free. (Unfortunately that procedure wouldn't automatically sync the Windows Media Player playlists.) Or one could just spend more money on an MP3 player with enough internal memory to hold the entire library, and then just use Windows Media Player or iTunes.
(This article mainly talks about Windows tools. I've recently switched to Ubuntu, a flavor of Linux. There is an appendix near the end of this article that talks about using Linux media player programs.)
Let me take a moment to talk about music file formats. Most people are familiar with MP3 files. Unfortunately the MP3 file standard hasn't kept up with the times, and other file formats sound better for the same file size. Apple and Microsoft are promoting the AAC and WMA formats, respectively. Both formats can be DRM-protected or unprotected. The problem with these formats is that they aren't free: AAC codec creators pay patent royalties, and WMA is proprietary (but free for Microsoft Windows users).
Enter two lesser-known formats, Ogg Vorbis and FLAC. Both formats can be used for free. Ogg Vorbis, file extension .ogg, is comparable in quality to AAC and WMA. Yes, the name is definitely weird! FLAC is a lossless standard; if you rip a CD to FLAC, the FLAC files are just as good as the CD. FLAC files are compressed, so they're smaller than WAV files, but much larger than MP3, AAC, WMA, or OGG files. Personally I have chosen to rip most of my music to Ogg Vorbis.
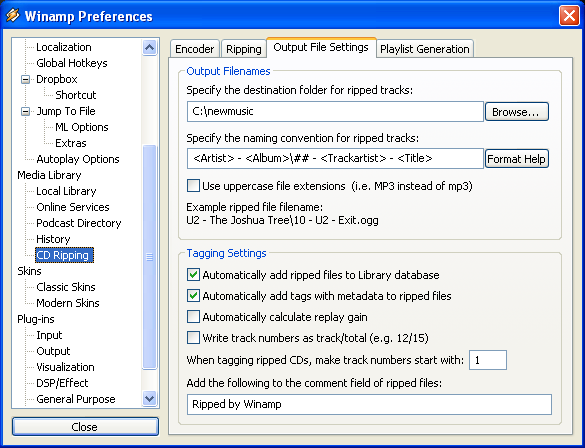
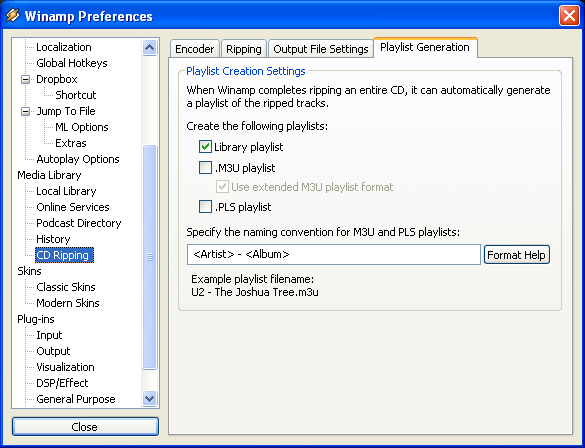
I use playlists to manage all my music. Many portable music players will allow people to manage music by album, but that doesn't work well enough for me. That doesn't allow me to add songs to a list, or subtract songs, or change the order, or make my own lists. Playlists will let me do all those things. I make my playlists on the computer and then sync them along with my music to my Clip Zip. On a device as tiny as a Clip Zip holding my entire music library, the only practical way to navigate around my music collection is with playlists. I make sure that every song is on at least one playlist. I have Winamp set up to automatically create a playlist when I rip a CD.
Winamp uses two kinds of playlists: playlist files (either M3U or PLS), and library playlists. If you just rip CDs in Winamp and sync to a portable device then all you'll care about is library playlists, which are used by Winamp internally, and are edited in Winamp's middle pane.
If you want to move music from one library to another, whether the two libraries are on the same computer or on different computers, then you'll find playlist files useful. A playlist file is a file (obviously) with a list of audio files to play in order. Playlist files are edited in the pane on the right or the top-right (if that pane is active). The two types of playlist can be a bit confusing at times, but there is an excellent YouTube video that describes how to manipulate the two types in Winamp.
Okay, enough background, let's get down to it.
If you don't have DRM-protected audio then you can skip this section (lucky you). If you do have DRM-protected audio, either songs that you bought or audio files from services like audible.com or rhapsody.com, then you have a choice to make. The world is moving away from DRM, thank goodness, so one choice could be to get rid of your DRM-protected music files. That's what I did; I converted all my DRM-protected music to non-protected in a legal way, by burning the music to CD and then ripping the CDs. The sound quality isn't as good, because it's an imperfect copy of an imperfect copy, but the reduced sound quality and the hassle were worthwhile to me in exchange for not having any restrictions on how I listen to my music.
If you don't want to get rid of your DRM-protected files, and you can fit all of your DRM-protected files on the internal memory, then my recommendation would be to use Windows Media Player to manage the DRM-protected audio (goes to the Clip Zip's internal memory), and Winamp for the non-DRM audio (goes to the external micro SDHC card). Unfortunately that involves some hassle, because you would need to set up both Windows Media Player and Winamp, and you'd need to switch the Clip Zip's USB mode all the time: MTP mode for Windows Media Player and the internal memory, and MSC mode for Winamp and the external card. But it could be done.
In order to use both Windows Media Player and Winamp you would want each program to have a separate music library, and you'd want to be sure that each program ignores the audio files in the other music library. (If for some reason the two programs both discovered the same music file, then the music file would be copied twice to the Clip Zip, once to the internal memory and once to the external card. I'll let you figure out the exact procedure on your own. Hint: keep each library in a separate place, know where they both are, make sure that each folder where music files might be is monitored by only one program and not both.
From now on I'll talk mostly about Winamp, because Windows Media Player can't sync files to the Clip Zip's external card, as far as I know. Update: Windows Media Player 12, the version that comes with Windows 7, will sync files to an MSC device such as the external card of a Clip Zip, but it won't sync the playlists. What gives, Microsoft? I'd recommend using another program instead, like Winamp or Media Monkey. I tried Media Monkey when I was setting up a friend's Clip zip, and it was very easy to set up sync to the external card, so I like it.
These steps assume you'll be creating a new library, or moving files from an old library in a different place to a new library.
If you haven't done so yet, now is a good time to rip your CDs and copy your non-DRM protected files into Winamp's music library.
Okay, you should now have your library set up on the computer just the way you want it. Next you'll need to set up the external card, if you haven't already. On the Clip Zip, go to "Settings > System Settings> USB Mode", and select MSC. (If you're curious what these different modes are, then read "Appendix: What the Whole MTP and MSC Thing Is All About" at the bottom of this document.) Turn off the Clip Zip. Plug the micro SDHC card into the Clip Zip, make sure neither Winamp nor any other media player is running on the computer, and plug the Clip Zip into the computer with the USB cable. The Clip Zip will turn on, the computer will discover new devices and such if it's the first time the computer's seen the Clip Zip, and then the computer will show two new drives. If you get a window asking you what to do, click "Open folder to view files" for both. On my computer the internal memory is labeled "SANSA CLIPZ (E:)", and the external card is F:. (I'll call them E: and F: in this document; if your drive letters are different then use the letters on your computer.) Right-click on F: and click Properties. There will be a box where you can type a volume label. I recommend you give the external card an easily-recognized label such as "CLIPZIP EXT". You only get 11 characters.
The factory Clip Zip firmware should have created three folders on the external card: F:\MUSIC, F:\MUSIC\AUDIOBOOKS, and F:\MUSIC\PODCASTS. I think these are good conventions to follow, even if you plan to use Rockbox instead of the factory firmware. (I'll talk about Rockbox later.) Rockbox wants to see playlists in F:\Playlists. I believe the factory firmware doesn't care where it finds playlists, but Rockbox does, so let's follow Rockbox and put playlists in F:\Playlists (just like that, with a capital P and the rest lowercase).
Start Winamp with the Clip Zip in MSC mode, connected to the computer with the USB cable. The first time you do this, Winamp will ask you if you connected devices that Winamp should manage. I recommend saying no for the internal memory, "SANSA CLIPZ (E:)" on my computer, at least for now. For the external card, "CLIPZIP EXT (F:)" on my computer, say yes. (Your drive letters may be different.)
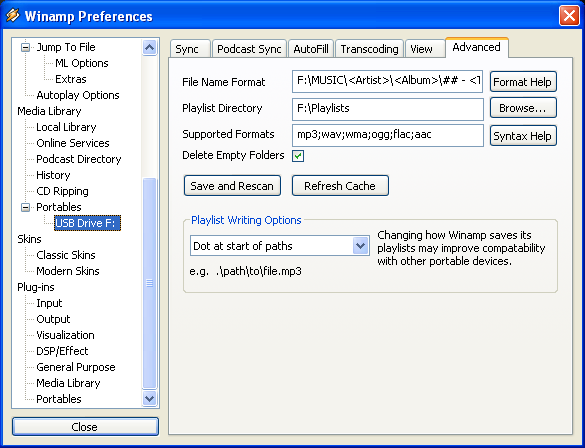
In Winamp's Media Library pane on the left, right-click on "USB Drive F:" and click Properties. Click on the Advanced tab of the window that appears.
Great! You should be ready to sync at long last! In Winamp, click on "USB Drive F:" in the left pane, and then click on the Sync button in the middle pane. Winamp will tell you how many files it needs to move to the device. Click OK, and sync should start. You'll know it's working because immediately under "USB Drive F:" in the left pane there will be a new item that says "Transfers", with an animated icon that looks like two little arrows pointing at each other, and a percentage. If the icon is animating, and the percentage is less than 100%, then it should be working. You can click on "Transfers" to see what files are being transferred if you're curious.
The first sync can take a long time; I think the process took six hours (!!) on my computer. It's a good task to let the computer work on overnight.
One disadvantage of sending files to the Clip Zip via MSC mode is that when the transfer is done and the Clip Zip is unplugged, the first thing the factory firmware has to do is to find out what changed, and update its song database ("refreshing your media"). This process by itself can take a few minutes, or more than an hour; during that time you can't use the Clip Zip for anything, and it better not run out of battery before it finishes. With the Rockbox firmware you can use your Clip Zip immediately after syncing; see below for more information about Rockbox.
So if you've done your first sync and everything works on the Clip Zip, then you're all set up. You should be able to easily add music to your computer by ripping a CD, or buying some MP3 files online and downloading them, and then the new songs should automatically go over to the Clip Zip the next time you sync. Your music library is now completely portable. Enjoy!
Because "refreshing your media" takes so horribly long, don't plug the Clip Zip into your computer just to charge it; use a plug-in charger instead. And try to hold off syncing until you won't need the Clip Zip for a while. For safety, plug the Clip Zip into the wall charger immediately after you sync, so it won't run out of battery while it's "refreshing your media". Or bypass that whole problem by using Rockbox instead of the factory firmware...
The Clip Zip with the factory firmware works fine, but some people like tinkering, and some folks have created new firmware for many different MP3 players, including the Clip Zip. The project is called Rockbox, and their website is www.rockbox.org. Rockbox coexists with the factory firmware; when Rockbox is installed you can boot into the factory firmware by just holding down the left button while you turn the Clip Zip on. You can always remove Rockbox without a trace if you don't like it, so don't be afraid to experiment if you're clever with computers. There is an installer program, so doing the installation isn't too difficult. You can find the large manual for Rockbox on the Clip Zip for downloading or reading online here (find Sandisk Sansa Clip Zip on the list for the manual specific to the Clip Zip). If you want to try Rockbox, start by downloading and running the installer from here. If your Clip Zip is running a factory firmware version that the installer doesn't recognize, you'll be asked to download a firmware version that the installer does recognize; if so, the installer will tell you which version to get, and you'll have to go to Sandisk's web site and download the .bin file for the firmware version yourself, which should only be a minor hassle.
So what does the Rockbox firmware do that the factory firmware doesn't? Lots of things. For starters, it installs a version of Doom, the first-person shooter game from the early nineties, on the Clip Zip! Doom on a 96x96 screen is a bit silly, but the capability is impressive. More useful perhaps is the graphic equalizer. Best of all for me is not having to wait after every sync for an hour while the factory firmware "refreshes my media" before I can use the Clip Zip. With Rockbox you can navigate straight to the playlists and fire one up immediately after syncing; the database is updated in the background while you use the Clip Zip to do something useful, like play music.
Of course Rockbox has a few disadvantages. First, Rockbox was created by computer geeks, so there are lots of menu and options that aren't there in the factory firmware, and the manual makes it sound very complicated. It's not too hard to figure out how it works by playing with the Clip Zip though. Second, the default fonts are really, really tiny, but that can be changed fairly easily by downloading a new "skin".
My advice: if you're not a tinkerer, then skip Rockbox. But if you are a tinkerer and you don't mind the Clip Zip being more complicated, then go ahead and try Rockbox. I did, and I like it, but I had to change the font size right away because I'm old.
MTP (Media Transfer Protocol), the USB transfer mode setting, is a protocol invented by Microsoft for transferring media files and metadata to media players. It supports DRM (Digital Rights Management), and it was invented for Windows Media Player. In order to prevent piracy of DRM-protected files MTP mode doesn't allow direct access to the files on the device, although they can be copied to and from the computer via MTP. If a media player like a Clip Zip is connected to the computer in MTP mode, then the computer recognizes the device by brand and model, e.g. the computer knows you plugged in a Clip Zip. DRM-protected files can only be transferred to the internal memory of the Clip Zip, and only with MTP mode. MTP mode has the advantage that the computer knows that the device is an MP3 player, and what model, so it's less ambiguous than MSC mode.
MSC (which stands for Mass Storage Class, short for USB mass storage device class) on the other hand refers to the more generic USB protocol used by USB flash drives and similar devices to allow an operating system to directly access files stored on a USB-connected device. The downside is that an MP3 player in MSC mode appears to the computer to be just an external drive or two, indistinguishable from a USB flash drive or a small external hard drive.
If the USB connection mode on the Clip Zip is set to auto-detect, then the computer will connect to the Clip Zip in MTP mode. The only way to get the computer to see the Clip Zip's external card, when the card is plugged into the Clip Zip and the Clip Zip is plugged into the computer, is to put the Clip Zip into MSC mode. (You could also take the card out of the Clip Zip and plug it into a micro-SD-to-regular-SD adapter card and plug that into the computer, but that's a hassle.)
I recently switched to Ubuntu, which is a flavor of Linux that I like a lot. One of the first things I did after switching was to experiment with media player programs. My version of Ubuntu came with a media player called Rhythmbox. Rhythmbox is a very basic, low-frills media player. Unfortunately, because my Windows XP computer crashed, I had to recreate all my playlists in Rhythmbox. At first that procedure was easy enough. But as I created more and more playlists, Rhythmbox got slower and slower. I eventually learned that Rhythmbox keeps its playlist database in a "flat file", which is a slow and inefficient way to do it when there are lots of playlists. Also I didn't like how Rhythmbox shows album art in a tiny window that can't be enlarged. So I decided to try Banshee. Banshee doesn't get slow just because there are many playlists, and it allows the user to resize the album art. It has more "bells and whistles" (useful but nonessential features) than Rhythmbox, and I like it.
There was one catch with synchronizing the Clip Zip with either Rhythmbox or Banshee: the program assumes that the Clip Zip's external card isn't part of an MP3 player, and that the Clip Zip can only play MP3 files. There is a work-around: to put a special file named ".is_audio_player" in the root folder of every MP3 player device. In Linux the dot at the start of a file name makes the file hidden; in Nautilus (the Ubuntu equivalent of the Windows File Manager), typing Ctrl+H will show all such files. The ".is_audio_player" is a text file with a special format; the file identifies the device as an MP3 player, and documents the capabilities of the MP3 player, such as what file types it recognizes. Unfortunately the format isn't very well documented, but Google led me to an article or two that had the information I needed. Apparently all the Linux media player programs use this same standard for recognizing the capabilities of MP3 players. So I created a ".is_audio_player" file in the root folder of the Clip Zip's external card, and the next time I ran Banshee the program recognized the Clip Zip's external card and asked if I wanted to synchronize my library to it. I did synchronize my library to it of course, and ever since then synchronizing my Banshee library to the Clip Zip's external card has been easy. Here is the .is_audio_player file for my Clip Zip's external card.
name="ClipZip external card"
audio_folders=Music/
output_formats=audio/mpeg,audio/x-ms-wma,application/ogg,audio/x-flac,audio/x-aac,audio/aac
playlist_formats=audio/x-mpegurl,audio/mpeg-url
playlist_path=Playlists/

endoffile=PlaceThisHereToEnsureThereIsABlankSpaceBeforeTheLastLineOfTheFile
© Robert Locher 2014-2015. All rights reserved.
